|
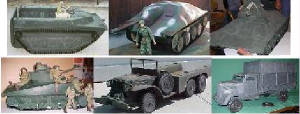
Buying Custom pieces for your 1/6th Vehicles
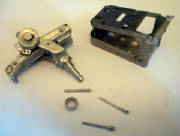
| M-23 mount for .50 cal MG |
|
| Sample picture from ArmorPax |
ArmorPax's Website
ArmourGuy has added several new products! Including this awesome towing hook.
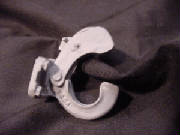
Armour Guy's Website
John's Stuff Website
Where do you buy plastic sheet?
There are many sources for Styrene and ABS sheet materials. Many hobby shops carry both Plastruct
and Evergreen brand Styrene and I get alot of mine there. However, sheet can be very expensive this way. I heard
some customizers get their materials from Home Depot, Walmart and thru industrial sources. This material comes in the
form of Bathtub liners, signs and product packaging. I'm sure if you give it a little thought you might know of a source
you hadn't thought about.
Below are two online sources of plastic sheeting and materials.
Industrial Plastic Supply, Inc
Plastruct, Inc.
A Word on Glues
The following are excerpts from Sixth Division posts regarding glue use on DeSimone vehicles. This
has the be the most asked question!
(Gun Shy) JB Weld will give you time to set things into place, but it takes hours to dry. When
it dries though, it will be the toughest part of the unit, they use it to "weld" transmission cases together.
You can
paint it while it's wet, and the color will become part of the weld.
Some swear by Gorilla Glue.
http://www.gorillaglue.com/gGlue.html
http://www.jbweld.net/
(LaughingGravy2) For any type of sheer-stress joints on this stuff, I haven't found a single suitable
adhesive.
JB-Weld works ok, as does GOOP and Homax Welder. They just provide a basic mechanical joint that doesn't
hold as well as I'd like (I'm a bit rough on my toys). The plastic isn't pourous enough, nor does it react with the adhesives
like, say, a model would.
The best results I've had are a combination of those adhesives and actually welding the
plastic itself, or using small screws.
(GermanBilly1) I used epoxy, super glue, silicon. screws they work. The material seems to have
a oil base. I roughened it up. But any stress and snap clean break. But it still looks good. I have used JB weld and that
stuff is stronger that steel, I'm an automotive tech on German cars, so I know all the glues that are out there. But there
is nothing for it to eat away or stick to.
(Gun Shy) ... this is just a typical sample of the type ...
http://www.libpro.com/epoxyputty.htm
It's a 2 part pre extruded mix, which you cut in segments, and mash and kneed to get the reaction going. Once you get
it all mixed up, it gets warm to the touch, and is wicked sticky. You have about 15 minutes to work it, you can smooth it
with your fingers, you can paint it wet, and when it hardens, provided you didn't spread it out paper thin, it's tough like
the JB Weld.
Trust me, this when freshly mixed is VERY sticky, and it will stick to just about anything in this state.
Once something like that is used, and everything is dry again, those epoxy rolls and JB Weld will stick well, and they
work best if you can "trap" a surface with the stuff, instead of just putting a layer on the surface.
Some people have
told me, if you drill little holes in one of the surfaces you want some of this stuff to stick to, it then lets the epoxy
or the JB Welb to flow down into those holes, and when hardened, will act like plugs. The trick here, is to once again let
the material "trap" the surface.
(PrvtNoClass) I don't know if James used the same type of material for the opel as his T-34, but
on my T-34, I attached the turret to the turret ring (after I cut the ring from the chassis) using the Homex Heavy-Duty Welder
and it worked great!!! I followed the hints that others gave about sanding it using course sanding paper (both parts) and
using an awl to create dimples for bite. I also clamped it (before gluing) and drilled holes through both parts and used some
twist ties to hold it in place while curing. I put a ton of the stuff on, tightened my twist ties, re-attached my clamps and
let it sit for over 24 hours as per their recommendations. I didn't even clean off the extra until it dried. It worked as
well as I could have hoped for that use/project. That was also my first attempt to attach it.
(GermanBilly1) What I found worked where you don't see it is to drill small holes and lace wire
through it and before pulling it tight add whatever glue. then when it is pulled tight the glue fills the small holes and
it is fixed for good. I only used this on high stress points. It is a trial and error thing and what ever works. The end is
the means. If it looks good that is what counts.
(LaughingGravy2) Yes, all the rebuilt areas on my JD vehicles were done using Bondo and predrilled
holesies (tiny holes....it's a technical term). The holes-and-gunk-of-choice method, and screws work very well, however,
and provide a very durable attachment. The thick plastic lends itself well to both methods.
(Gun Shy) ... as I just do like many others here do, experiment, cussing when things don't work,
and smiling when they do.
Just included the links for the various epoxy and glue sites, and remind people to read the
instructions for their products closely, as the "devil" is in the details.
The idea of using a wire or a small brad
to be an inner core is a good idea, and it worked very well for rebuilding a broken handlebar on a 21st motorcycle. I used
the standard JB Weld to do that job, and because of the long set up and dry time, I needed something to help hold things in
place. I shaped a small brad to fit into the 2 ends tightly, then slathered and shaped on the JB Weld. When things started
to set up, I used a figure to hold the bars in place, and shaped things further to be nice and smooth by painting the still
tacky JB Weld with some paint. Not too much, or you break the JB Weld down. When things were good and dry 15 hours later,
it looked like new, and it still is working just fine.
JB Weld is tricky, in that you have to rather closely mix the
2 elements, but if you have to choose, go a bit more on the real epoxy side than the hardener side, but only a bit.
JB
Quik is very strong when hard, but it's very hard to work with, it sets up in about 5 minutes and you have to keep your hands
wet or it will stick to you like mad, and you will rub your skin raw getting it off you if it does stick. This one is best
for shoving into places that need a heavy reinforcement, or for getting something into rough shape and then you finish it
out by filing it, grinding it, drilling it, or using one of the other compounds to add the fine details to.
I sculpted
a whole new leg onto a 21st German Shepard that had one torn off by using the Plumber's Epoxy, and it has made a permanent
and good looking fix. Most people don't know it was fixed, until I show them which leg was the one replaced. Sometime I'll
try to show some items fixed up with the methods listed above in pictures.
One more item that some hardcore model people
have turned me on to, is Milliput. Dries in about 20 minutes, and is almost as strong as JB Weld. It too can be sanded,
filled, sawn, drilled, even tapped.
http://www.milliput.com/home.htm
From KDf
I too had troubles finding a glue to stick to JD's stuff. I found the best glue its called E6000. You can use with out
any final prep. Its at most craft stores and walmart. I have been using it for years. I found out about it when I was a cadet.
We used it to put on our patchs. Its so strong you can even wash cloths with the patchs on them. Its a little tricky beacuse
its thick. I use a tooth pick to apply it.
A Tip From Big Kohona on the use of putty!
Thought I'd share this little hobby tip that I was just made aware of. I've been working on my 21 Stuart and ran out
of putty. I had been using Testor's Red putty, which I swore by as it sanded well and could be thinned with liquid cement
while it was still wet.
Horror of horrors I ran out of this putty and as no local shops carry it, I figured the Stuart
project would be on hold while I tried to find an online etailer to mail order it from.
While relaying my tragic story
to a friend and fellow modeller, he suggested I pick up a tube of auto body glazing and spot putty. The brand he had been
using was made by Bondo.
So off to Canadian Tire I went, found the stuff and zipped home to give it a go. Man, am I
glad he pointed me to this! At $4 Cdn a tube (4.5 oz or 128g) this is identical to the Testor's putty that I favour yet a
heck of lot cheaper.
So now the project continues and I hope that someone else here will benefit from this little tidbit
of hobby knowledge!
Kinda funny how they can take an everyday (well, relatively everyday automobile product), put a
label on it and call it a "hobbyist's product" and charge double! LOL
Now off to get some Acetone...
The one thing I should also mention, last nite after I spoke with my buddy to thank him for the tip, he mentioned that
you should store the putty standing up, as over time, it tends to seperate (I found this to be true with the Testor's Red
putty as well). This can lead to it becoming a tad dry in the tube (which had begun happening with my last bit of the Testor's
putty I had been using up).
Something else I just discovered about the Bondo is that if you wet it again with Acetone or liquid model cement it will
soften and start to revert back to a putty like state (Tamiya's Grey putty does this also).
This is a "feature" I prefer
as when I am applying another layer of putty, it gives a better bond between the layers. Plus you can also make your slurry
to fill in finer areas or detail surfaces (say like the surface of a cast tank turret). Gunze Sangyo has a product called
Mr. Surfacer, comes in 3 grades that I am aware of. Although one's home made concoction would possibly not be as fine, it
would do the job nicely, especially in 1/6.
BiG K
How To Paint Those Plastic Tracks!
Used on the T-34, Hetzer and LVT
I was able to prime and paint some I put on an old PA 251 but I had to wash them first in soapy water. Rustoleium
now makes a plastic primer that is very good. I use Tamiya gun-metal spray paint originally on them and it stayed on fine.
I oversprayed that with some flat coat.
Thanks to Tim (plasticpanzers) for this tip!
|