|
LaughingGravy2's Dodge Truck Upgrade
3/22/2004
I brought home one of the demo-models from the DeSimone Show last night and have been busy with upgrading it.
I want to preface this whole project by saying that this is fairly extreme,
as simple as it is, and not at all necessary in order to have a very cool and functional truck as James sends it to you. If
you are at all on the fence about these, I assure you that the existing model is quite ready to be used and enjoyed.
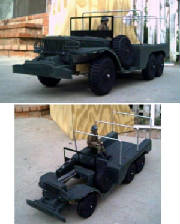
With that said, I'll show you what I'm tackling. The initial kit with
nothing cut out.
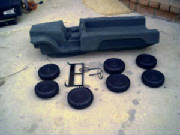
Here, I've taken a major step from the issued design, and removed the inside wheel wells (along with the accessory panel).
Essentially, this eliminates any type of mount for the axles. But, that's the next step.
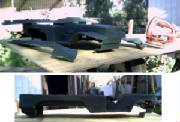
Don't be fooled or intimidated. I simply cut 4, 1 inch wide strips of 3/8 plywood, added an 8 inch spacer brace at the
rear, two more at the flex and front of the bed, and a 4 inch long spacer brace at the front with brackets(bent scrap strips
of aluminum) to hold the tension. The strips are laminated with glue and tiny nails, straight until the bend, then the curve
is established and the strips are then glued and nailed while bent. This provides an undercarriage and subframe assembly.
Just an extra I wanted to try out. Again, not needed for a working vehicle.
A stainless tube for the axle to run through, and then some handbent aluminum scrap strip for axle mounts. All three
axles are getting the stainless tube treatment.
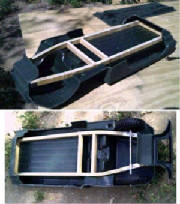
Just an added extra detail. The bed floor has good detail of the metal trim between the floorboards on the 1:1s, so,
I cut some scrap wood very thin and matched it to fit between those raised ridges. I'll paint a dark color, then the US OD
over that and sand down back to wood to simulate foot traffic/wear. Not visible, but I also cut the engine covers,
except for around the fenders (I'll get to it  ), in order to have those open later. ------------------------------------- All
this in the first day. Maybe 3 to 4 hours work. No special machinery needed, unless a table saw and handheld jigsaw are special
tools. A jigsaw (you can see my red Skil model in one of the pics) cuts through this stuff like wet birthday cake. I love
this plastic more and more as I work with it.
3/23/2004
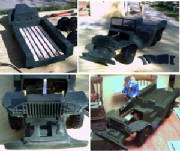
Today, I mostly trimmed and fit some stuff. No woodwork. Most of the major cutting-out of stuff is done. All axles
and wheels are mounted. I may still play around with the height here. Windshield mounting holes are drilled.
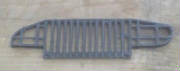
Radiator is in from the inside. Grate/guard is cut and temporarily mounted, winch is dovetailed into front of bumper
in order for it to fit, but this locks it into place. I'll get around to making a "functional" one from this eventually.
The
bar through the center of the hood opening serves multiple purposes. It effectively keeps the body spread properly after the
cutting away of the hood halves, it adds rigidity to the piece, and the small bend at each end will serve as the anchor for
the holes that pins will pop into for the hood to open.
Ok, I thought I was done for today, but I wanted to test my idea before I forgot it . I'm trying to get as much done as quickly as I can to possibly give those who will be receiving
theirs some ideas. Plenty of room for improvement on what I'm doing by the masters out there, but at least it'll show you
all some possibilities. Hope I'm not being a pest with this. Anyway, here's the latest and last step for day 2. Still
have to fine tune, fit, and adjust, but it worked fine. Enjoy. Sorry for the poor pic quality.
This plastic is easily worked. Even more so if you set it out in the sun for a little while. I've done most of the detail
cutting and trimming with an exacto knife.
The guard already comes with the raised impression of the bars quite pronounced
and visible. Just take a drill bit that fits between the "bars" and drill out at each end of the groove you will want to have.
Slip the exacto carefully into either hole while making sure of the cut, and simply use a "peeling an apple with a knife"
motion to trim next to a "bar". Don't over-exert in case there's a slip. Just be steady and patient, and that blade will slide
through the warmed plastic easily. Once you reach the opposite hole, turn the project around and do the other "bar". Ease
up as you get close to a hole to prevent accidental slicing through. Just remember; it's always better to not cut enough,
than to cut too much. You can always go back and trim afterwards. Just pleeeeaaaase don't cut yourselves (I know it's ridiculous to say that, but somebody, somewhere....). I should say that I'm
not telling anybody to do it this way, but that it's just the way I did it.
I also cut the height almost in half,
because the model I'm making had that in order to clear the winch mounted on the bumper.
3/24/2004
Not alot of big stuff done today. Mostly just fitting parts and such. Got the stops put in for the hood doors which also
serve to close off the fender-well in the front. And, three of the canvas bows are made and mounted. I was originally going
to do these the old way, with steam-bent wood, but upon further inspection of photos, I'll have to eat my words and go with
the accurate metal (in this case, aluminum).
3/25/2004
Slow day today. Some errands, chores, etc.
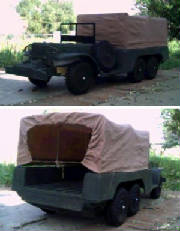
All I did was make the fabric cover for the bed area. I'm short two
bows yet, and have to put the small window in the cover, too. Anyway, I'm satisfied with the results.
The material for this top is a cotton twill. One side(the side you'd use in 1:1 use for clothing) has the lined look
of denim, while the back has the familiar cross weave of canvas. It's very supple and works quite well as scale canvas. I
color it with a watered down acrylic soaking, then stretch it over the bows while wet. Snugs-up and shapes real nice when
it's dry.
3/31/2004
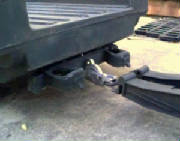
Not too much to report. I took the weekend off, and just fitted and filled yesterday. I also did this up in an hour-and-a-half
or so (aside from the overnight for the JB Weld that cleaned-up some edges). This working pintle hitch is all aluminum and
pulls that Hasbro 155 Howitzer (thanks PlasticPanzers) quite well. It isn't all that accurate, but I'm happy with it.
It works pretty much like the 1:1 version.
|


