Capistrano Island Command

Home

History of Capistrano Island
Sector 1 - Command HQ
Sector 2 - Cove and Boat Facilities
Sector 3 - Airbase
Sector 4 - The Barracks
Sector 5 - Fire Services
Sector 6 - Bomb Disposal/Hazmat
Sector 7 - Training Facilities
Sector 8 - Tac Med Unit
Sector 9 - Armory and Quartermaster
Sector 11 - TOP SECRET REVEALED!
Sector 11 - What is Anomaly 26F?
Sector 11 - The Mission, OPERATION DARK PORTAL
Sector 11 - OPERATION DARK PORTAL PHOTOS CONTINUED
Sector 11 - The End of OPERATION DARK PORTAL
Mainland Support Operations - Undercover
The Girls of Capistrano Island
Story of the Dragon Pup Aircraft
Photo Album - Dad's WWII Pics
World Trade Center/Pentagon Tribute
Flash Force in Afganistan: Operation Enduring Freedom
Vintage Iron Knight tank and Kitbash
Building a 1/6 Vickers Mk VI tank
Building a Type 97 Te-Ke Tankette
Building a 1/6 scale Bomb Disposal Robot
Marder III - Sunny Smile Tank Conversion
Research and GI Joe Links
My USDOC Uniform Page
Building a 1/6 Vickers Mk VI tank

light_mark6b.jpg

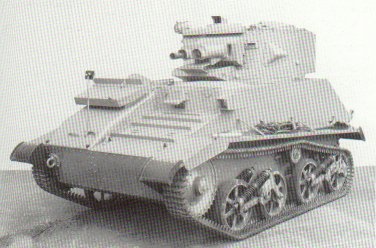
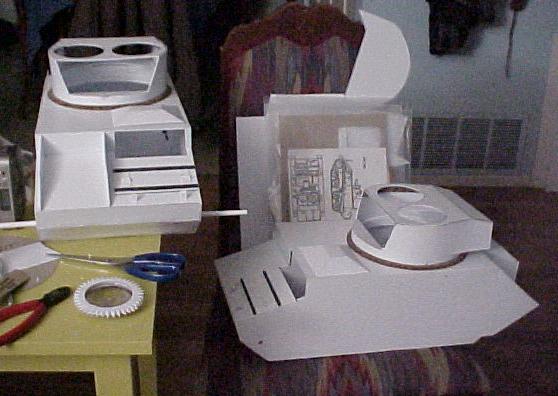
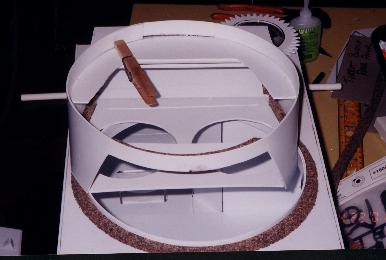
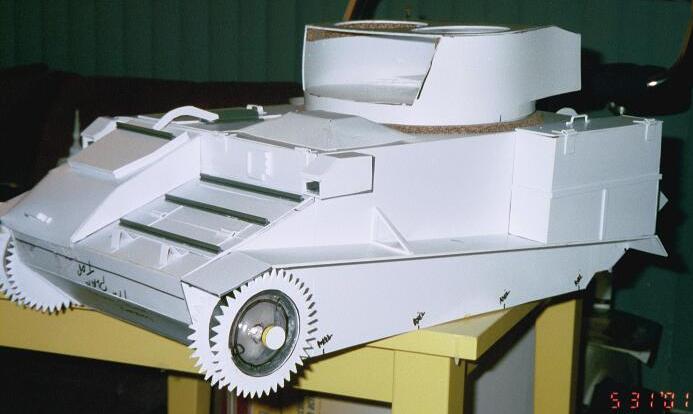
This is a picture of a 1930's British Vickers MkVIb Tank I am scratch building. Currently I am building two of these with the collaboration of Jeff Finney who will be doing the final painting work. These tanks were used during the retreat at Dunkirk and in North Africa, notably at Tobruk. Not an outstanding design, it was badly out classed before the war even began. But it was all the British had for a long time outside of captured Italian tanks. My two models will be a depiction of the Australian Desert Rats tanks from Tobruk.

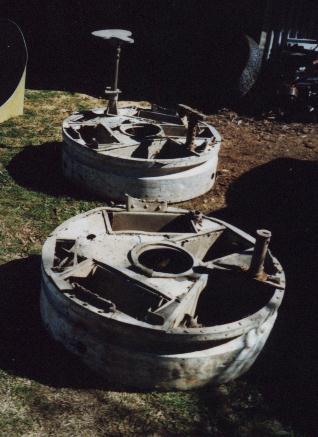
Below is a link to two of the many sites I have been using for a reference for this project. 90% of the reference material for this project came from the internet. These particular sites have extremely good, clear close up shots of various sections of this tank. Thanks go to Chris Shillito for his website and additional photos he provided for me.

http://www.armourinfocus.co.uk/vmkvi/

Another terrific site with detail pics of this and many other vehicles is Build2Scale.

http://www.8thfold.com/built2scale/home.cfm

Here is a picture of the turret floor of a Vickers Tank.

floorbasket.jpg

This link is to a webpage that has the picture of the Vickers Tank turret floor (see pic above). I have not yet decided if I will go this far, but the possibility is definately there.

THANKS GO TO Douglas Greville FOR THE PICTURE AND LINK TO HIS WEB SITE.

http://members.nbci.com/dgrev/albask.html

Vickers1.jpg

vickers2.jpg

vickers3.jpg

turretbrace.jpg

sprocketwheels.jpg

trackmaterial.jpg

para1.jpg

para1.jpg

para1.jpg

RoadwheelConstruction.jpg

suspension.jpg

MORE PHOTOS TO FOLLOW AS WORK PROGRESSES

Pic 1 shows the first tank hull with the driver in it. I plan on this being the version used at Tobruk hence the hat, but there will be no room for the hat in the finished model. Drivers space was very cramped and a special cut out with cover was installed for more headroom in the real 1/1 version.

Pic 2 shows both tanks under construction. I have finished
with the interior in the one on the table, added the deck and finished the turret ring. Unfortunately the drivers hatch is giving me some problems at this point so I had to remove it and completely redesign the entire upper hatch.

Pic 3 both turrets are partially done at this point. Work has begun on the road wheels. I had to scrap the original idea for the road wheels. Work has also begun on the engine compartment cover on the front of the tanks.

As work progresses, I had to add bracing to the inside of the turrets (pic 4). Because of the shape of the turret the sides would pinch in so the turret would not fit on the turret ring without a fight. Here the bracing is clearly visible and is only half done. Still the turrets don't quite fit right on the turret rings. My current plan is to cut down the turret rings and rebuild them in a smaller diameter. This should correct the problem.

The biggest question for modeler's building a 1/6 scale armored vehicle is what did you use for tracks and wheels? I made my own wheels (pic 5). The original plan to cast a sculpt of the road wheels failed. Plan 2 involved me scratch building them and here you see the front geared sprocket wheels in various stages of completion. I used thinner Styrene material that was flexible and was fairly easy to cut with a pair of shears. I originally used a pair of wire snips to cut out the teeth, but found later it was by far easier and cleaner to cut them out with shears. The rubber tired road wheels have been cut out of a piece of ABS irrigation pipe. I scratchbuilt the spokes and found some rubber sleeves that fit over the pipe. I will be cutting sections from the sleeves to fit on the road wheels as tread. However, that will not be permanent until after the paint job.

Tracks were harder to do until I found this material (pic 6). I had planned on trying some difficult process to make each link, but that would have stretched this project over a year or more at this rate. I found this foam material at HomeBase which is now defunct in my area unfortunately. This was made in Germany and yes I kept the label. The reverse side of the mat is a really nice looking tread pattern. This material is strong, flexible and easy to cut with a pair of scissors. Here I marked off the size of the track in preparation to cutting. *UPDATE* I have found another supply of the same material at Walmart. As floor mats cut in the shape of a huge foot or a fish. Same material but with about 2-3 different molded variations. I did find the same mold pattern as I am now using but does not seem quite as crisp of a mold to me. Perhaps that is just my imagination. Should I find this material anyplace else I will keep you all posted.

Pic 7 shows the almost completed hull details. The one detail I am saving for last is the hull rivets. Vickers tanks had LOTS of rivets and I will be using my favorite trick for these, miniture doll eyes. I can't recall offhand what size (I think 3mm) I used, but they are the smallest I can find and come in a gross lot of 144 for roughly about $1.00 a bag. I usually find them at my local craft supply store (Tall Mouse).

In Pic 8 I have attached the axels and slipped on the road wheels (still lacking rubber tread at this point).

In Pic 9 I am currently working on the suspension details. This is taking far longer than I anticipated as I have to carve each piece from stock styrene. For the springs, I used Solder wire and wrapped it around styrene tubing.

Pic 10 shows the parts of the road wheels. I cut 2" PVC pipe for the wheel and added spokes and the hub. This was really easy material to work with. Then I bought the rubber gasket sleeve (and exterior 2" sleeve gasket) and was able to cut two wheel treads from each one. You can see the completed wheel at the bottom left. The rubber tread will not be added until after painting.

Pic 11. The completed suspension and road wheels. I have already completed the tracks as well and they have come out much better than I had anticipated. Again, those will not be installed until after painting. Pics of the tracks will follow. The pink supension wheel at the top came from a Real Friend airplane. At this point the hull for tank #1 is completed and I am presently bringing hull #2 up to date before I continue on to the turrets. Once those are finished, the tanks will be ready for painting and be delivered to Jeff Finney for his final approval.