|
All pictures below are thumbnails, click on them for larger images.

|
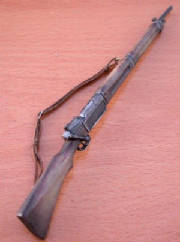
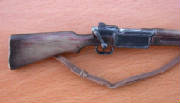
| Original Brian Vota rifle |
Normally I don't bother with working on Brian Vota's custom weapons. Mostly because I like them just fine and I
think they are some of the best custom weapons out there. However when a very good friend of mine wanted to improve
on his Vota MAS-36 rifle I couldn't refuse.
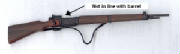
The Problem
In the picture above you can see the rear sight is too tall and the bolt doesn't line up with the rear of the bolt.
Philip Garcia wanted this corrected. His thought was to build up the bolt and reciever. However, I could see this
would still not fix the problem as raising this part of the rifle would bring attention to the fact the barrel and front stock
are also to low.
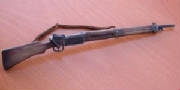
My solution was to cut behind the rear sight, raise the rest of the rifle to the proper position and build up the bottom
of the weapon. This would prove to be far easier as there is really no major detail on the bottom of the weapon as opposed
to the top of the weapon where you have to deal with the sight and sling attachments as well as the reciever and bolt.
So with Philip watching as I started this project, I carefully cut the rifle in half just in front of the trigger and
rear sight. You should have seen Philip's face when I snapped the rifle in half! Fortunately Brian Vota didn't
mold the weapon with a wire running thru it for strength. It would have been a mess if he had.
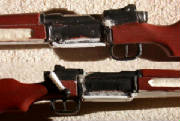
Using pieces of thin sheet styrene I built a new hinged plate on the bottom of the reciever and filled in the lines on
the original mold with putty. I also thinned down the bolt handle as Philip had thought this was to thick.
It was about this time that Philip decided to go home. I think he had enough of watching me break his $10.00 investment!
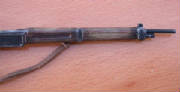
I also trimmed down the length of the barrel as Philip and I thought it was to long. I believe later Philip
trimmed it down more to a realistic length. On a real MAS rifle the bayonet was a long spike that fit into the rifle
stock with the socket sticking out under the barrel. I drilled out a hole where this shaft would have fit, but was limited
by the length of my drill bit and the difficulty of working around the barrel. I got about halfway thru the stock but
way to short to make an actual functioning bayonet.
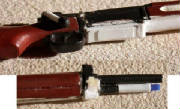
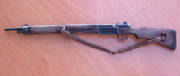
My solution to this problem was to make two bayonets. One was only the socket part that you can see in the above
photo. This would represent the bayonet when stored in the proper place. I made another bayonet turned around
so you could fix the spike end into the hole and make a rifle with the bayonet fixed.
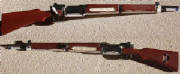
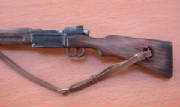
In the picture above you can see that Philip had already removed the original sling. Brian Vota's solution to the
sling attachment was to glue the sling to the buttstock instead of trying to replicate the actual attachment point.
As this simplified molding he could hardly be blamed for this and it did look very presentable anyway. But little details
like this can make a single piece stand out.
Philip had cut off the molded part and put a staple across the sling cut in the buttstock. Then he added the rivet
detail on each end of the staple. It was a very nice job too. I personally would not have done it this way, but
it looks every bit as good as anything I would have done.
You can also see how I built up the bottom of the stock in this picture.
|


