|
All Pictures below are thumbnails, click on them for larger images
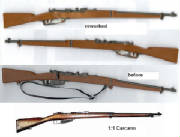
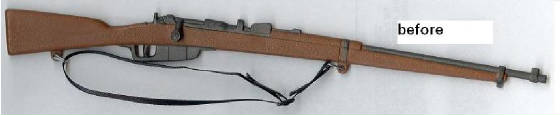
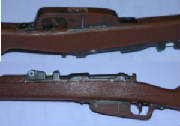
My first goal was to create a decent master piece to make a mold of this rifle. In the above picture you can see
my final finished reworked master. Below that is the original weapon I started with and last is a picture of the real
1:1 scale weapon. The completed master was sent off to a friend of mine to make a mold and start casting.
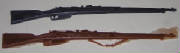
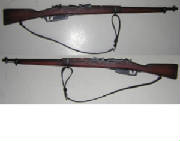
In the picture above the first rifle was made by The Toy Surgeon and the second rifle was made by a friend of mine.
The first person I contacted to make this weapon had no experience up to this point molding something like this and he took
several months and several emails with no results before I got impatient and contacted The Toy Surgeon.
The Toy Surgeon did a wonderful and professional job on this project and had his first batch of rifles to me within a
couple months of my initial contact with him. His work was a thing of beauty. Nice, crisp molding and no bubbles,
I thought it was injection molded at first!
Just after I got my first batch of rifles from The Toy Surgeon, I got an unexpected package from my friend and he had
gone ahead and completed my original order and sent it to me. I was very surprised but the quality was nowhere near
what the Toy Surgeon did. Lots of flash, bubbles and many of the rifles were completely usable as they were badly warped.
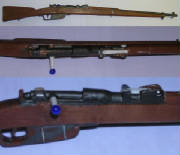
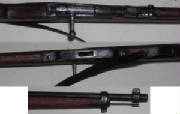
These next three photos are as far as I can take the detailing of this weapon. I will not be detailing all the
rifles this much as it would just take to much time to do that many, but I will do a few like this. In these pictures
I have:
1. Added a wire cleaning rod
2. Filled the grooves in the sides of the magazine housing with putty to smooth it out
3. Cut off the original sling swivels and replaced with wire ones
4. Trimmed the butt plate
5. Drilled out the barrel
6. Cut off the old sight, grooved the handguard in the appropriate place
7. Detailed out the rear sight
8. Cut off the molded turned bolt and added a correct straight bolt arm
9. Cut and trimmed the receiver in the appropriate places
10. Carved hole in bottom of magazine housing where the ammo clips fall out

This rifle is now finished and ready for painting. I have also made up more realistic slings and will attach that
after I get them back from painting.
Here is the finished rifle. Thanks go to Philip Garcia for painting these for me. He is
a very talented painter!
|