|
All pictures on this page are thumbnails. Click on them for larger images.
See below for materials
|
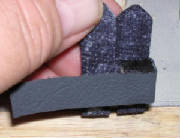
| Step 1 |
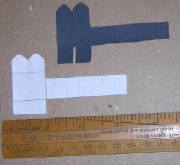
First I create a paper template. Using the pattern I carefully cut out the design from my selected material
|
| Step 2 |
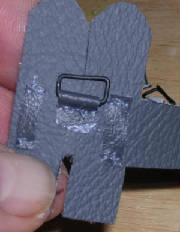
Next I sew and/or glue the belt loops and suspender bracket on the back of the ammo pouch.
|
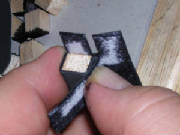
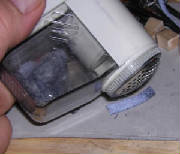
| Step 3 |
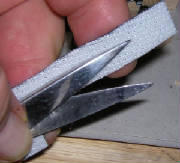
Using surgical scissors and a battery operated lint remover that I bought from Rite Aide I trim as much of the cotton
backing off of the material. I don't try to completely remove it as that would be very difficult. I do try to
thin it out as much as possible so it doesn't show thru the final piece and make it look sloppy.
|
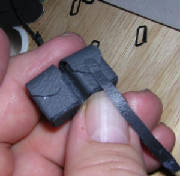
| Step 4 |
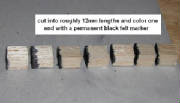
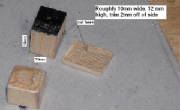
Now I cut a strip of balsa wood into 12mm lengths. I color one end with a black Sharpe felt pen as this will help
disguise the balsa wood. The balsa strip I bought had to trimmed on one side as it was slightly to thick by about 2mm.
|
| Step 5 |
This step shows the proper dimensions and how I trimmed the pieces to the proper size.
|
| Step 6 |
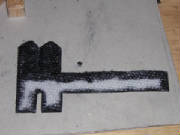
On the cotton side of the material I color the edges and flaps black with a Sharpe felt marker. This is a messy
process and care must be taken to not get it all over the grey side of the pouch. This will help 'hide' the white cotton
interior of the pouch.
|
| Step 7 |
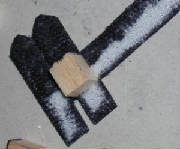
The balsa pieces are used to 'form' the pouch. Center them in the area the pouch will be. I usually glue
mine in place with the Zap-a-Gap glue.
|
| Step 8 |
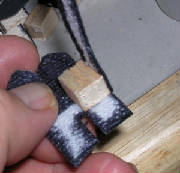
Next I 'fold' the long piece over on the balsa form and glue each panel in place as I go. I try to keep this relatively
tight as it gives a much more crisp detailed look.
|
| Step 9 |
It starts to take shape as I fold the material over the front and glue it in place.
|
| Step 10 |
At this point when I have folded over the material on all three sides of the balsa form, I fold it back on itself and
glue it in place. Now I place another balsa form where the second pouch goes and glue that in place. I continue
folding till I cover all three sides of that form also. Carefully trim off any excess material.
|
| Step 11 |
The last step is to fold the bottoms up and glue them in place, trimming any excess off as you go. Now to add the
strap that secures the top flap in place. I cut a lighter material to shape and trim off the excess cotton backing.
I discovered using the lint remover worked really well here and took the cotton backing almost completely off.
|
| Step 12 |
Next glue or sew the strap to the top/front of the flap the covers the top. Be sure not to fold
the top down tightly as the real one was made of thick leather and it had large gaps on the sides. Carefully arch the
flap over the top and then I glue it in place.
Here is where you can see the black felt pen coloring really makes this look much better than leaving the cotton backing
white. On real pouches there was a post on the bottom of the pouch to secure the lid strap.

|
| Step 13 |
I take a small round headed pin to create the post on the bottom of the pouch. I color the head with a Sharpe black
felt pen. I could have used paint but a felt pen was so much faster. I needed two of these for each pouch, one
for each flap strap.
|
| Step 14 |
Trim the pin to the right length. I try to leave enough to go thru the strap and well into the balsa form.
|
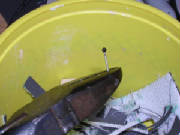
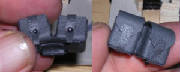
| Step 15 |
In this final picture of a completed ammo pouch you can see how I placed the pin thru the bottoms of the pouches thru
the strap. That's it! An Italian infantry soldier would normally wear one of these pouches and the suspender strap
would wrap around the user's neck and both ends would hook onto the pouch or two pouches could be worn and each end of the
suspender would hook onto one pouch.
Italian suspenders looked more like a belt than European "Y" strap suspenders that we are used to seeing. They
wrapped around the neck and hooked the pouches in the front but did not come down the back and hook the belt like "Y" straps
do.
|


