|
Pictures below are thumbnails, click on them for larger images
I started this project with the goal to make three Breda light machine guns for myself and two other collectors.
As the project continued I was contacted by another collector who made a deal with me to make one for him as well. So
the count was up to four.
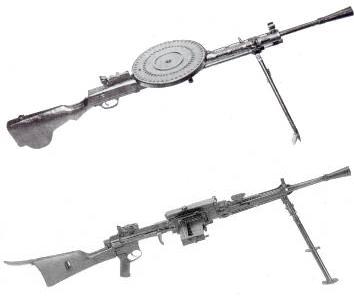
I used Dragon's Russian DP LMG for this project because of it's very close configuration to the weapon I wanted.
I saw no need to make this one from scratch as I had a very good base to work from. I had two other options to work
from. I could have used Hasbro's vintage Russian DP LMG as I had an extra but availability of three more and the fact
I would rather not destroy vintage parts plus the fact the mold was very basic precluded using that one. The other alternative
was to use 21st Century's DP LMG which was a close second. But again the mold was not quite as crisp and the availability
was questionable.
In the end I was very glad I decided on Dragon's version. It was a choice that saved me much work. The front
barrel jacket was not a solid molded piece and that saved me tons of carving work to remove the top of the barrel jacket.
How Dragon accomplished this molding is quite a mystery to me but also attests to their superior experience in model kits.
My first priority was to create a prototype master. I concentrated on one weapon till it was completed except for
the rear sling attachment. As that required a great deal of thought as to how I would accomplish that, I thought I would
save it for last so I could at least make all four of them fairly uniform in appearance. Once the prototype was
completed I could start on the other three in an assembly line type of production. I had done some work on one of them
up to a point but stopped and then brought the other two up to that level. With some small changes after eyeballing
my reference materials and the prototype, they are coming along quite nicely.
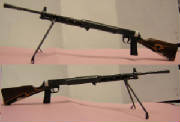
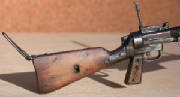
In this first picture I have already done extensive work on the buttstock. Added a pistol grip and done some cutting
work on the top of the barrel jacket. One thing that concerned me was the length. In the real world the Russian
DP was longer than the Breda and using metric measurements (which was all I could find) the difference appeared to be quite
a problem. However once I had done the conversion into inches I discovered the actual difference was only a couple inches.
For this project that was quite acceptable as it sure appears the big companies in the Action figure market do not appear
to be ready to produce anything Italian any time soon.
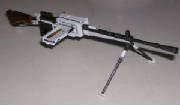
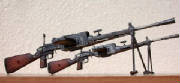
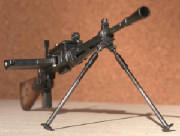
The next three pictures are different views of the nearly completed weapon. I still have to add the cut in the
stock for the rear sling attachment and then it gets the paint treatment.
Now that the prototype is finished, I'm starting on the next three weapons.

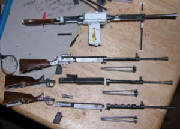
I first break the weapon down into it's three sub assemblies, the buttstock, the reciever and the barrel. After
trimming the buttstock down to the proper configuration, I have to fill in the holes with filler putty as the stock is hollow.
I cut off the part just in front of the trigger.
On the reciever, I cut off the Charging handle and rear sight. I take care to cut the rear sight off clean as I
have to trim it down, turn it around and reattach it closer to the stock. Then I fill in the extra holes with filler
putty.
The barrel assembly takes the most work. I carefully cut off the bipod so I can reuse it later and attach it in
the proper location. I trim off the sling attachment and then I cut off the top of the barrel jacket. This requires
some carving.
Once I have those parts done I can reattach them and then begin to make my additions to change it into a Breda LMG.
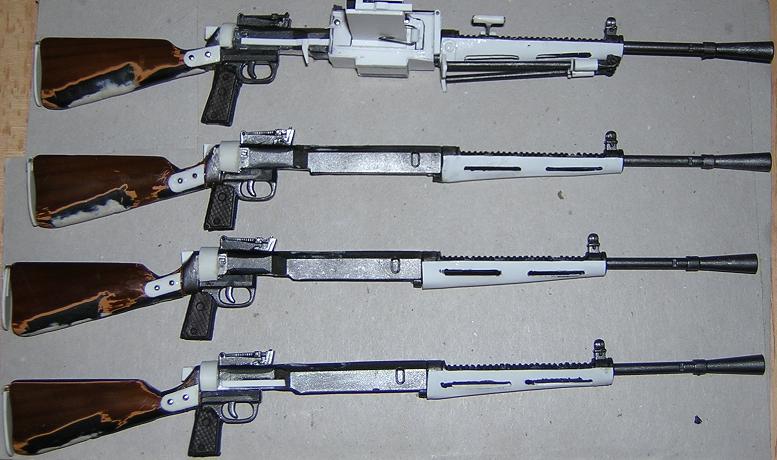
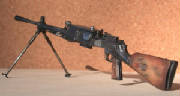
I've already finished carving the upper barrel jackets off in the next picture. Then I reattached all the subassemblies,
trimmed the rear sight down, turned it around and reattached that. Added the pistol grip, new barrel jacket and (working)
hinged shoulder support.
I still need to reattach the bipod and start working on the recievers. Except for a million little tiny details
to be done, that is basically it.
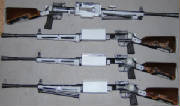
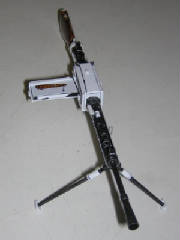
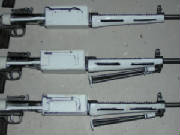
In the above and below photo I have added the front sling attachment and have started on the reciever/oil pump housing.
You can see on one I have already reattached the bipod.
Because of the weak attachment point of the bipod, I have to drill a hole thru the bipod into the barrel jacket and insert
a steel pin. This makes a very strong connection that will be less likely to snap off.
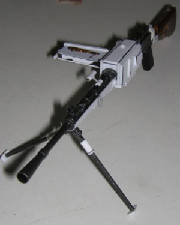
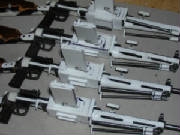
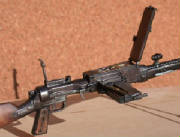
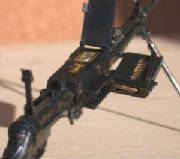
In the picture below, I have started to detail out the reciever/oil pump housing. I added the front and back sides,
an additional panel on the bottom to cover up the joints and cleaned up the joints on the top. Here in this close up
you can see some of the reciever detail I have started to add around the location of the magazine. I have also finished
the charging handle rails. Just after this picture was taken I added the charging handles finishing that part of the
weapon on all three LMG's.
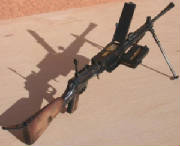
I have also added one more bipod with one more to go. In this picture though you can see I have started to finish
up the detailing on the bipod. One drawback to the Dragon bipods is they are very, very loose. To tighten them
up takes a great deal of effort and isn't for the light-hearted. I add just a bit of Zap-a-Gap glue to the joint and
continue to work the leg back and forth until the glue sets. This takes some time and I cannot stop till the glue sets
or it will become solid in place. When dry it works really well.
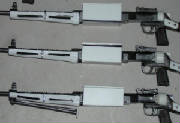
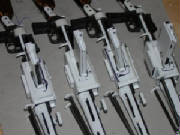
I've finished! Well at least with the construction part. All four weapons are now done and ready for painting.
I will be sending these to Philip Garcia for painting next.
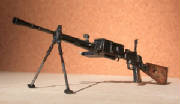
Here I have added the magazines and all the finishing details including the cut in the stocks for the rear sling attachment.
Now they will be going in to be painted and when they are returned I will add slings.
I am also presently making a couple ammo boxes for this weapon.
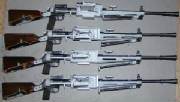
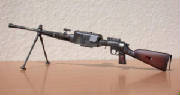
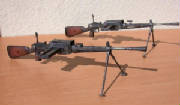
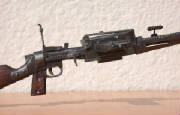
All finished! That is except for a sling. Once again, Philip Garcia
did an incredible job painting these. I feel bad about overloading him with paint jobs (well, not really) but it was
worth it. Finished photos courtesy of Philip Garcia.
Super Detailing the Breda LMG

10/20/2005
Well I'm at it again. After I made my first batch of Breda's I was contacted by two other 1/6th collectors of Italian
military and weapons. I ended up making another batch of five more of these guns and improving on the first effort with
more moving parts and a higher level of detailing.
Once again, Thanks go to Philip Garcia for his outstanding painting skills
on this weapon! More thanks go to Fabio, the designer for Twisting Toyz's
Italian line for supplying me with detailed photos of the real thing without which I could never have done this level of detail.
|