How To Tie Japanese Leg Wraps
Home | 1/6th Vehicle Projects | Photo Stories and Dioramas | James DeSimone Vehicles | My Custom and Kitbashed figures | The Armory | Dad's WWII Pics | Related Links
ACTION FIGURES AT WAR

Japanese Leg Wraps

All pictures are thumbnails.  Click on them for larger pictures.

Tools - Forceps and magnifying lenses to work with are a must.
 
Examine - Identify the front and back of the leg wraps.  Usually the inside has the label and/or seam on it.  The outside is smooth in appearance.  I used BBi leg wraps so I imagine that most 1/6th scale leg wraps you find won't have this level of detail on them if they come from other companies.  A 1/6th scale label?
 
Step 1 - Start at the top of the boot and wrap once completely around.  Note the 'pointed' end of the wrap where the tie is connected should be pointing to the back.  This helps to keep branches and grasses from catching in the leg wraps as you walk.
 
Step 2 - Slowly overlap and work your way up.  With molded boots you are going to get that strange 'bulge' where the boot is.  You can't help that unless you try to cheat by cutting a piece out of the back of the boot and/or building up the leg to match the top of the boot.  Wrapping tight over the boot and looser over the leg helps a bit.
 
Step 3 - When you get to the top, be sure to leave enough wrap material to go around the leg once completely.    

Click on picture for larger image

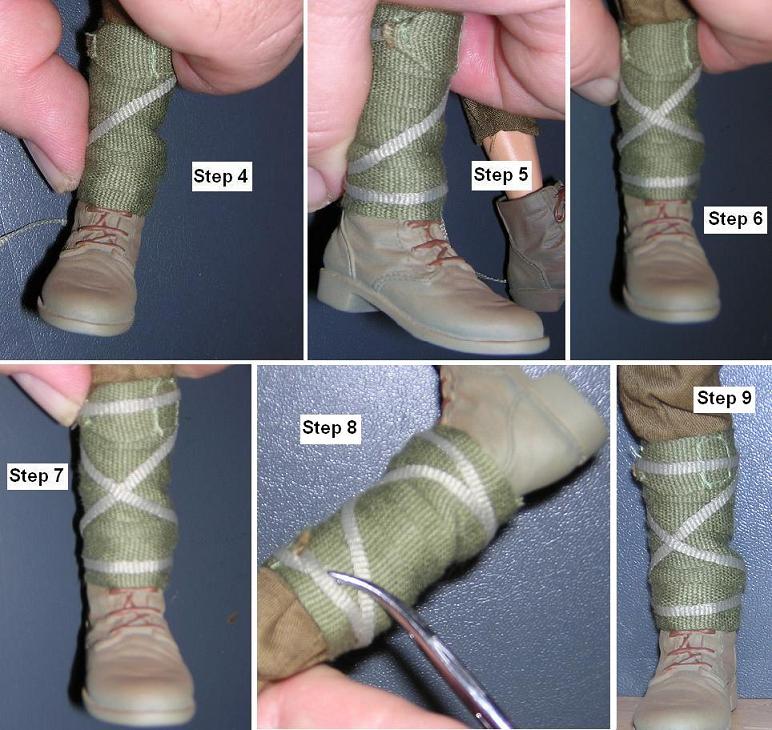
Step 4 - Wrap the tie once around the back of the leg.  As you work your way around to the front of the leg, pinch it with your forefinger and run the tie diagonally down to the opposite side of the leg.
 
Step 5 - When you get to the bottom of the leg, wrap the tie once completely around the bottom of the leg.  Be careful not to let go of the top or the tie will unravel.
 
Step 6 - Wrap the tie once behind the leg again then as you come around to the front of the leg bring the tie back up diagonally across the front of the leg. 
 
Step 7 - When you get back to the top wrap around the top of the leg till you run out of tie.  The BBi ties are too short so might have to rewrap if you come up short.  Chances are you will end up with barely enough to tuck it back under.
 
Step 8 - Use the forceps to tuck the end of the tie back under the overlaping part.  If you have enough you can try to tuck it into the top of the Leg Wrap material but I'm betting you have just enough for this and not any extra.
 
Step 9 - That's it!  Now do the other leg. 

Click on picture for larger image

How do they wrap real puttees?

These are called 'Leg Wraps' or 'Puttees', but no matter what you call them they are a pain in the (you know).  If you tried to tie real ones like the 1/6 ones above they would fall off within a few steps.  Sadly BBi didn't include enough tie material to do it properly.  Not all Japanese leg wraps were tied like this but using the 'X' pattern on the front was very popular.
 
In real life, I hated leg wraps with a passion and tried to avoid using them whenever possible, but on occassion I did re-enactment impressions where I had to.  Mostly WWI battles.  Not surprising they switched to canvas gaiters or leggings.
 
Ok so how did they really tie them?  The material on leg wraps was far more stretchy then the 1/6th ones BBi did and the ties were much longer.  The end of the tie was usually tucked in like I showed above but there was enough to do this two or three times that gave more strength to it.
 
One last tip.  Be patient.  You very well might have to re-wrap and tie them again and again to get it just right and with practice you will get better.  But even those of us with experience still have to deal with it.  The one I demonstrated above I had to re-wrap about two dozen times before I got it wrap just right.  And embarrasement of all, on one try I even put it on backwards! 
 
I ought to know better.