|
After eyeballing it and pics from books and the web. I pulled out my parts box. (I dont throw anything away). I
used parts from several vehicles including a Stuart, and the Hasbro Halftrack .
The wheels I will save for last because for me this will be the hardest to do.
This plastic is very easy to work with, I havent had to "glue" anything on yet but have used screws up to this point.
Or nails in the case of the tracks.
These are pretty straight forward pics. I am using the Stuart parts for the most part, I am turing a Stuart into
a M5 High Speed tractor, so i have the top half to use for parts. This is just the start, I have a loooonnnggg way to
go. But I can't think of anything that will be very costly. I think that this is a GREAT vehicle for a base
or to let the kids get ahold of out of the box. My 9month old crawled all over it, sat on , pushed it around with no
ill affects.
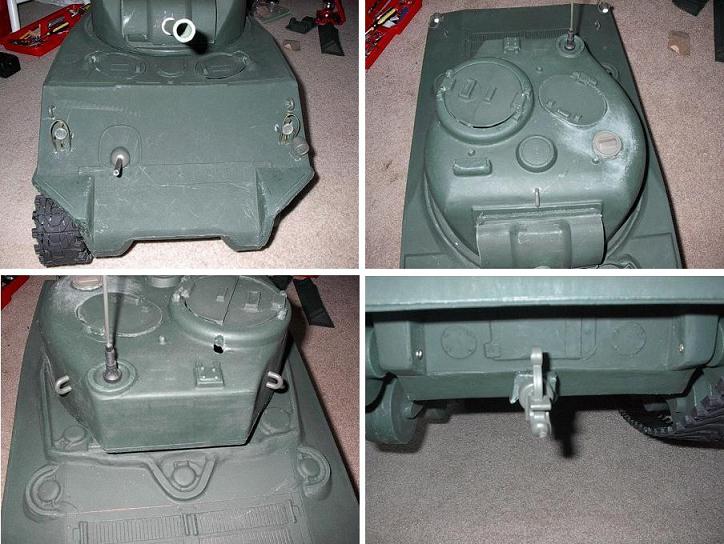
These pics may help you or may not. If nothing else it should give you some ideas. I have worked on the hatches
, .50cal mount, front slope and a few other things just dont have time to post pics right now. The most expensive thing
i plan on doing, will be detailing the engine compartment. All the tools and parts i scrounged off of a M5 Stuart that
i am going to turn into a High Speed Tractor.
Here is a pic of the Mantle after I had attached it to the turret. I used WS-70 ½ wood screws from Wal Mart. Bulldog
brand. They work well with the soft plastic and hold great. Just make sure that you get the angle right so that the screws
dont show on the top of the mantle as they go into the plastic.
Here you see the mg that I added. I have drilled the hole on the upper left as well you just cant see it in my crappy
pics. This is the pic of the right side on the back before the tools were added. Here you see where I have added
the tools. In order to get the tool brackets to hold better I used my dremel and created a depression to help hold the tool
brackets in place. Once I figure out how I will go back and make straps to hold the tools down.
Pic of the gas tank before I started hacking at it. Here is the pic once I was done. I still have to place a styren
bottom under the gas cap lid and then angle the plastic down so that it looks right. This is still a work in progress.
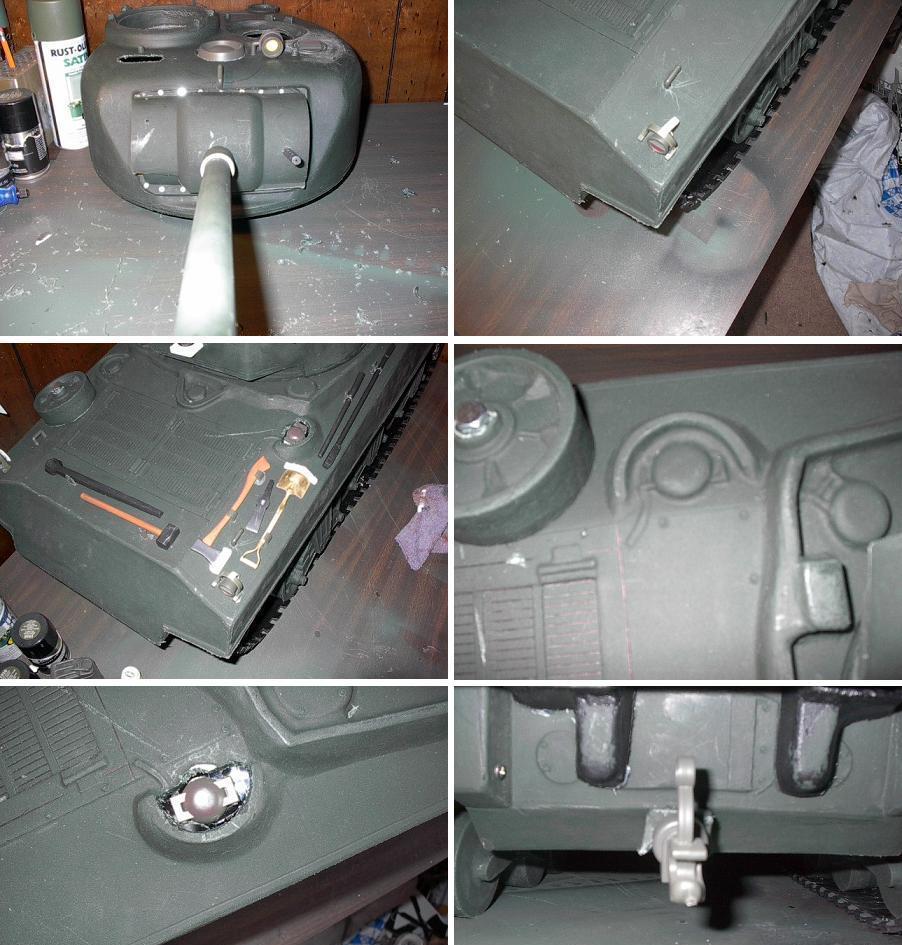
I added the Exhaust provided by JD, from what i have seen on the web and my book, JD's exhaust does not line up as they
should. I am going to add a exhaust shield anyway so i will just leave them as is.
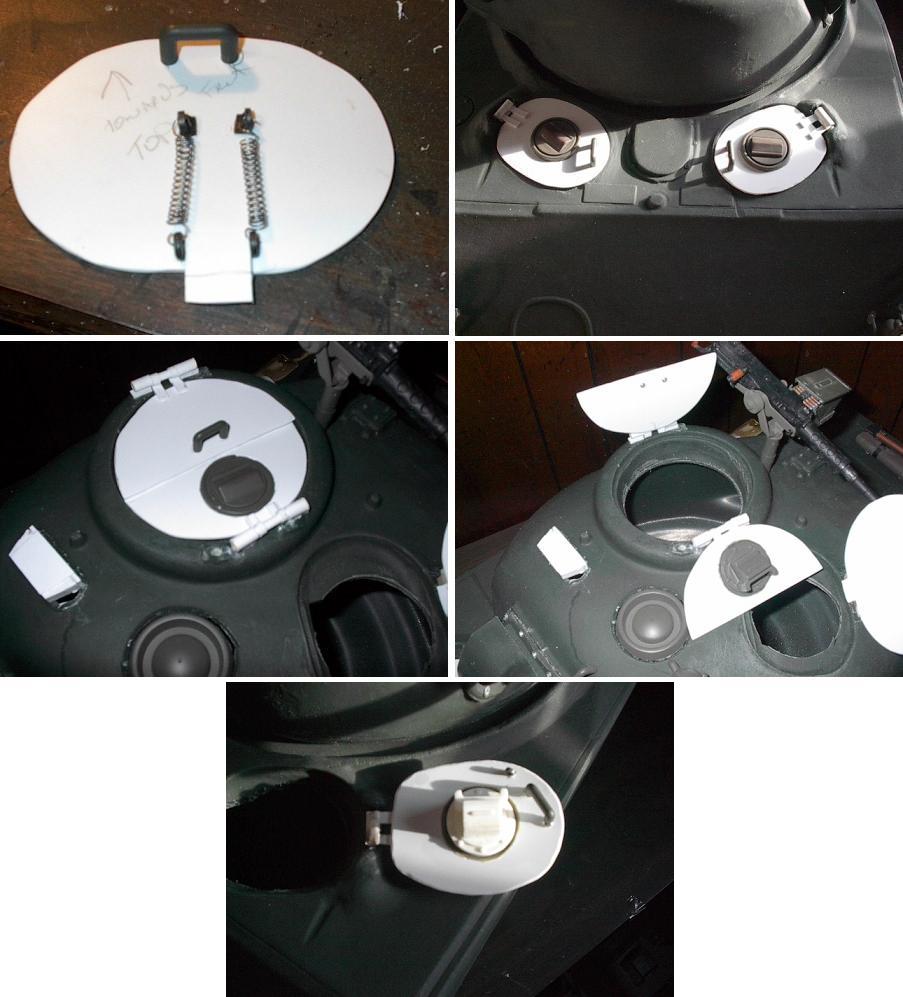
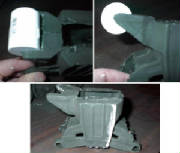
Keeping with my goal to spend as little money as possible, I wracked my brain to think of a way to make the hatch cover on the turret
look "right". I cut off the round prongs off of one Hasbro water cooled tripod and used the round supports from a broken
Dragon MG-34 tripod. I glued them in place with Modeling Glue to the styrene hatch. To make the springs I took the springs
out of two click pens. Using a pair of needle nose pliers I pulled out both ends of each spring and made them flat.
Thats it for now.
Here is the completed hatch. I have added the hinges and the hatch is now on the tank. Again I used
leftover parts from my parts box to make this hinge. Using leftovers from my Hasbro Halftrack.
This is a shot of my drivers hatches closed. These are now on the tank. I used styren and styren tube, and wire to complete
these. The Hatch Periscopes I got from one of the board members Johnny E4. The handles are from the parts box left over from
my Stuart. I used wire to hold the hatchs on .
Here is my commanders hatch, completed and on the sherman. These are made out of styrene and leftover parts from my Stuart.
The hinges are styrene and styrene tubing. This picture is of the commaders hatch open, I still need to add some details
but this is what it looks like open. This picture shows the drivers hatch open so that you can see some of the details
that I have added.
Thats it for now. I am working on the .50cal cradle and a couple of other things now.
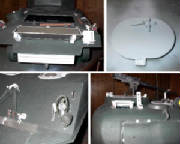
Here is a pic of the Fuel tank gas caps holes, and the hole where the engine grate will go later on. Next are the finished
project gas caps in place. Styrene with the gas caps from the Stuart. Here is the hole that I cut out for the fire extinguisher
handle cover. I will install the handle from underneath at a later date. The front hull, I have mounted the lights,
light guards, I need to make the top plugs and chain for the lightplugs. And a few other odds and ends. Next I
am going to start working on the cable, travel lock, and spent casing bag for the .50cal, shell ejection port, periscope guards,
hatch pads, wet storage, and the Main gun cleaning rod, and outside phone.

The periscope brush guards that I added, along with the spotlight screw cap. I used styrene tubing 3/32”
for the periscope guards and leftover parts for the bolts. I wish I could have done like LG2 and used brass but
i am going to have to learn how first. I made the spotlight cap out of scraps. I used Styrene and Brass Hex Nut
0-80 and Hex Head Machine Screw 0-80 X ¼ from Micro Fashteners for this sprocket. This is a prototype I guess you
could say.
I added and Brass Hex Nut 0-80 and Hex Head Machine Screw 0-80 X ¼ from Micro Fashteners on the body of the tank
on the ventilator blower between the front hatches, and on the back deck.
I have made cable tie downs and installed
them, added the bar to the rear exhaust deflector. Added tiedowns for crew equipment.
I am working on the bogies and
road wheels now. Almost there!!!!!
Started work on my Bogie Assemblies. I cut out the return roller arm and replaced it with a ¾ coupling from Sutherlands
P/N 30107. They were .21cents a piece and they fit right into the slot where the Return Roller was.
Here is the Bogie assembly after I cut out the wheels and the Return Roller and the Track Skid. I will replace
the Track Skid with Styrene. I added three nuts to the bottom MS-82 Machine Screws Bull Dog HardwareDia #8-32 Lgth ¾.
I added two bolts heads on the ends of Bogie Assembly as on the real one. I also cut out the holes where they needed
to be. And I shaved off some here and there to get the proper angles.
I added a phone, exhaust and the wet storage. I have also made Bore Brush out of a dowel Rod and a Baby Bottle
Brush. Scratch built the interior hatch latch for the loaders hatch from Styrene.
I scratch built the Headlight socket plug out of styrene tubing and the chain is from the Dollar store. The commanders
fixed vane sight and the Gunner Periscope. Both built out of styrene. I made my phone out of styrene, styrene tubing
and rods. I eyeballed real pics of the phone and used that as my guide when measuring the spot where the phone
would go.
Well, I finally got all my supplies and started again. Here I used .080 Evergreen styrene to make the frames of
the Engine grate, I then used styrene halfmoons .100 to make the grating. The hinges are ¼ inch tube with 1/8inch styene
rod. The square plates on the hinges is .080 styrene doubled with a groove cut out using my Dremmel. I used Squadron/signal
Publicatins M4 Walk Around pages 33 and 34 for this.
This is just a sneak peak. I got my testors engine in the mail.
I have to make the engine compartment for this and then install it.

|


